Pages

Friday, March 18, 2011

Really, Really Easy Pumpkin Muffins

This recipe is great for taking a snack to Sunday School, taking a dessert, or to just have for breakfast.  It is literally SO easy, a two year old could do it.  (with help with the oven, of course!)  Oh and it's a Weight Watchers recipe!!  If you make regular-sized muffins, they are 1 point each....so the minis are probably 1/3 point. haha But whose counting?

You will need:
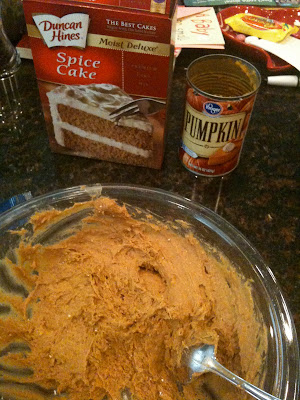
One box of spice cake mix
One 15 oz. can of pumpkin (not pumpkin pie filling, just plain pumpkin)

THAT'S ALL!  No water, no eggs, no oil, no lard...

What you will need to do:

1.  Stir up the two ingredients.  It will look very dry at first but I promise, it will all get mixed in and be very moist.  So DON'T add water, ok?  It should look thick and "gloppy."


2.  Fill mini muffin tin 2/3 full, or a little more.  Or you can use a regular muffin tin (bake for 18-20 min instead).  They only rise a little bit...not as much as cupcakes or other muffins do.

3.  If you wish, you can add a few chopped pecans or walnuts and a sprinkle of brown sugar to the tops, just before you put them in the oven.  This probably knocks them out of Weight Watchers category though.  I added chopped pecans to half the batch.


4.  Bake at 350 for 12 minutes for minis.


5. Enjoy!  They can be served warm or room temp.  Not sure how they would be cold.  Picture shows one without pecans and one with pecans.


Recipe yields about 44 mini muffins or 12 regular muffins.

Easy, right? Yes.

Wednesday, March 16, 2011

The Peach Pioneer


So it's Spring Break, and being in the Floridian 80+ degrees, we developed a hankering for some peaches. Our friend Meagan, with whom we are staying in the Tampa Bay area, had a great recipe to try, and her husband fetched us some fresh peaches from the store. I was amazed that they had peaches already, but Meagan said these technically came from Chile. Either way, it was great to taste a real peach. We made this recipe for a breakfast dish and it went great with coffee. I think it would also be good to try using apples and some cinnamon.

What You'll Need:
Cake & Filling
2 cans crescent rolls
1 8-oz. package cream cheese
1/4 cup powdered sugar
1 egg yolk
1/2 teaspoon vanilla or almond extract
1 can (21 oz.) peach, cherry, or apple pie filling
Fresh peaches! (Or cherries, apples)
Nutmeg to taste

Glaze
1/2 cup powdered sugar
2-3 teaspoons milk

Directions:
1. Preheat oven to 350. Unroll crescent dough. Separate into 16 triangles, reserving 4 triangles for decoration. Arrange 12 triangles in a circle (on a round stone pan if you have one!) with wide ends toward the outside edge of baking stone and points toward the center (Points will not meet.) Lightly flour a rolling pin and roll dough into a 14-inc circle, pressing seams together to seal. There should be a 3-inch diameter opening in the center. Form a slightly raised rim along inner and outer edges of dough.
2. In a batter bowl, combine cream cheese, powdered sugar, egg yolk and vanilla (& nutmeg if you'd like!); whisk until smooth. Spread cream cheese mixture evenly over dough to within 1/2 in. of edge. Spoon pie filling evenly over cream cheese mixture. (We added fresh peaches with the pie filling. Good move.)

3. Using a pizza cutter, cut each remaining dough triangle lengthwise into three strips. Arrange dough strips evenly in spoke-like fashion over the filling. Press ends to seal at center and outer edges. Bake 25-30 minutes or until golden brown. Remove from oven; cool 15 minutes.

4. For glaze, combine powdered sugar and milk; mix until smooth. Drizzle evenly over cake. Cut into wedges. Serve warm.


Yield: 12 servings. (290 calories each)

(from Pampered Chef)

Tuesday, March 15, 2011

Free Recipe Binder!

Head on over to Food Network Magazine's website for a free 1-2-3 Recipe binder!  I love keeping all of my recipes in a binder, not exactly sure how this one will look/work but you can never have too many!

http://www.foodnetmag.com/sweeps/enter/2

Sausage Cream Cheese Casserole

Here's my latest recipe on Tummies Full of Love:


What You'll Need:
2 cans of crescent rolls
1 lb. mild sausage
2 cups shredded cheese
1 8-oz. package of cream cheese

Directions:
1. Lightly grease a 9x13 pan and spread 1 can of crescent rolls on the bottom.
2. Brown sausage, drain.
3. Return sausage to skillet and mix in cream cheese until meat is covered evenly.
4. Spread cream cheese/sausage mixture in 9x13.
5. Spread 2 cups (or just the full bag) over the mixture.
6. Cover with the other can of crescent rolls, and bake according to the instructions on the crescent roll cans (usually 375 for 15-20 minutes.)

Here's a picture I took on my phone before consuming the casserole... not the best quality photo, but the food was good! Enjoy!

Wednesday, March 9, 2011

Cranberry Chicken

Directions:
1. preheat oven to 350
2. mix half of a bottle of Russian dressing, a jar of cranberries and 1 packet of onion soup mix in a bowl
3. place chicken in glass dish
4. pour mixture over chicken
5. bake for 1 hour


I served with steamed carrots and broccoli and sourdough toast but roasted red potatoes are very good with this as well. This is one of Will's favorite dishes.

Tuesday, March 8, 2011

Tasty Tuna Cakes

Brett and I love seafood, but our budget doesn't really allow for fresh seafood!  So when I came across this recipe on Kraft Foods I had to try it.  And we love it!  I'm just trying to find a great recipe for a sauce now.
Tuna Cakes

Ingredients:
2 cans tuna , drained and flaked
1 package Stove Top Stuffing Mix 
1 cup Shredded Cheddar Cheese
3/4 cup  water
1/3 cup Mayonnaise
2 Tbsp. Sweet Pickle Relish
1.  Mix all ingredients and refrigerate for 10-20 minutes.

2. Spray nonstick skillet with cooking spray and heat over medium heat. 

3. Use an ice cream scoop to scoop out mixture in balls about the size of a lemon.
 4. Fill skillet with scooped out mixture and flatten each one with spatula. 
5. Cook for 3-4 minutes (or until brown) and flip over.   Cook for another 3-4 minutes.

6. Depending on the size you make, it makes at least a dozen, even more.  I store the finished tuna cakes in the microwave until they're all done to keep them warm.
All done!
 
(I may have been doing something else and left them on a little too long, but I promise, still tasty!)  The best part is, they only cost a couple bucks to make!
  

Monday, March 7, 2011

Sweet and Sour Chicken

My mom sent me this recipe the other day when I was in desperate need for a quick recipe to take to a couple with a new baby!  So this recipe makes A LOT.  Definitely enough for 4-6 people.

You will need:
1-1.5 lb thawed chicken breast, cubed
3-4 tbs corn starch
1/2 onion, cut in 1/2 inch pieces
1 red pepper, cut in 1/2 inch pieces
1 yellow pepper, cut in 1/2 inch pieces
2-3 medium carrots, sliced diagonally
fresh sliced mushrooms, I used a whole pack for this large recipe
You can replace or add any of the veggies.  Other options are water chestnuts, bok choy, etc.

For the sweet and sour sauce:
1 can chunk pineapple in it's own juice (use juice and all)
1 cup water
1/4 cup white vinegar
3 tbs ketchup
1/4 to 1/2 cup brown sugar
2 tbs corn starch
crushed red pepper fleck to taste

What you need to do:

1. Cut up yo veggies


2. Cut up yo chicken


3. Put cut chicken in a ziplock bag with 3-4 tbs cornstarch and shake until coated


4. Cook chicken pieces in hot EVOO just until done (about 4 min).  Set aside.


5. Stir fry the veggies in a drop of EVOO until tender.


6.  I didn't take a picture of this, but start cooking your sauce in a separate sauce pan.  Pull all ingredients for sauce in the pot and bring just to boiling, stirring constantly.  Cook 2-3 min.  It will thicken over time.  Then add sauce to tender veggies.


7.  Add chicken to sauce and veggies to heat through.


8. I didn't take a final picture either, but serve a scoop of the mixture over white rice and voila!  Homemade sweet and sour chicken!

I took half of this to the couple with a new baby and we had enough for two meals also.  Like I said, it makes a lot!  My two cents...don't over cook the chicken!  And if your sauce gets too thick, add a tad more water or pineapple juice while it's cooking.

Friday, March 4, 2011

Stuffed Peppers

My sweet sister-in-love Shannon gave me this recipe which she got from her Grandma.  This is the only picture I could find of us that I'm not 8 months pregnant and lookin' like a whale.  It's obviously from my wedding, almost 4 years ago.  She was pregnant with her first baby boy, Jackson :)  Love her!


Ingredients:
4-6 Tri color peppers
1 lb. ground beef, turkey or chicken
1/2 sweet onion, diced
2 bags of microwaveable rice (fancy brand, like Old el Paso, not Lipton or Rice a Roni!) apparently it      comes in a can too but I can't find it in Louisville

1 small can of tomato sauce
2 C sharp cheddar shredded cheese
Adobo seasoning (optional-but Adobo makes everything better!)
the essential

the optional


Directions:
-Cut off the tops of your peppers (save for another recipe!).  Clean the inside and outside then boil peppers until "pokeable"  Yes, that is a word.
-Brown meat and onions


-Mix your rice, meat mixture, sauce and cheese (reserve 1/4 C)
-Stuff your peppers and top the with cheese.  Place in a sturdy casserole dish and add a little water to the dish so they don't burn.
Bake on 350 for 25ish minutes, until cheese is melted.  YUM!

Homemade Carrot Cake with Cream Cheese Frosting

You will need:
2 1/4 cups flour
2 tsp baking soda
1 1/2 tsp cinnamon
1/2 tsp nutmeg
1/2 tsp salt
1 cup butter-flavored shortening (just pretend this isn't in there! :)
1 1/2 cups sugar
3 eggs, room temperature (important!)
3/4 cup buttermilk
2 cups shredded carrots
1 1/2 cups coconut (I thought this was a little much, so I used 1 cup)
3/4 cup chopped walnuts
1/2 cup raisins, optional (I did not use raisins)

For the frosting:
2 (8oz) packages of cream cheese
1/2 cup butter, softened (important!)
16 oz powdered sugar
2 tsp vanilla
1 tsp almond extract, optional (I didn't have this on hand, so I left it out)

What you need to do:
1. Preheat oven to 350.
2. Combine flour, baking soda, cinnamon, nutmeg, and salt in a bowl.
3. Beat shortening and sugar until fluffy.  Add room temperature eggs one at a time, beating after each addition (important!).


4. Shred 2 cups of carrots.

5. Alternately add the flour mixture and the buttermilk, starting and ending with flour.  Gently stir in carrots, coconut, walnuts, and raisins (if desired).


6. Pour batter into a 9x13 inch pan sprayed with cooking spray and bake for 55-60 minutes.  Cool and frost with cream cheese frosting.  Top with additional chopped walnuts, if desired.

7. For the frosting: Beat cream cheese and butter at medium speed with an electric mixer until creamy.
 8. Gradually add powdered sugar, beating until fluffy.  Stir in vanilla and almond extracts.  This makes A LOT of frosting, so you can keep it refrigerated and use it on other things like cookies or graham crackers.

 And enjoy!!

Thursday, March 3, 2011

Philly Cheesesteak Sandwiches

You will need:
2 Tbs butter (I used EVOO in place of butter)
1lb boneless steak (any cut; I usually buy already thin sliced steak and just cut it into strips or have the butcher cut it for you)
1 medium green pepper, thinly sliced
1 medium yellow onion, thinly sliced (I didn't use onion)
Kosher salt
Freshly ground black pepper
Hot sauce, optional (I liberally used Louisiana hot sauce)
Sliced provolone cheese (I used Sargento slices)
4-6 Hoagie rolls

What you need to do:
1. Slice bell pepper and onion into thin strips.  Slice steak into VERY thin strips.


2. In a large skillet, melt butter/EVOO over medium-high heat.  When melted and bubbly, add steak.  Stir constantly. 


3. When the meat is about half way cooked (2-3 minutes), add onions and bell peppers.  Season with salt, pepper, and hot sauce.  Continue stirring until meat is cooked through and onions and peppers are tender.  Try not to over cook the meat or it will be really tough.  I usually turn down the heat to low-medium for the last 2 minutes, so the peppers are more soft, without overcooking the steak.


4. Spoon the meat filling into sliced rolls and add sliced provolone cheese.  Place open-faced sandwiches onto a baking sheet under the broiler for 1-2 minutes on high, or until the cheese is melted and bread is toasted.
5. Serve immediately.

Sorry, I don't have a final picture with cheese melted and all...we gobbled these up as soon as they were done!  Oh, my inlaws were here so we didn't eat all four ourselves! ha!  This is a great, quick recipe and could be for lunch or dinner.  My two cents...one pound of steak is just barely enough for 4 sandwiches, as you can see, so if you are feeding big men, I would get a little more steak.  But if you're making it for two, it's just the right amount with a little leftover!

Wednesday, March 2, 2011

Homemade Payday


This is one of my favorite family recipes and I probably make it more than anything else I make. It's super easy, super tasty, and pretty inexpensive, so why not? No refrigeration necessary, so it's a great recipe for parties, Sunday School, or mailing to someone.

What you'll need:
1 package of Reese's Peanut Butter chips
1 package of mini marshmallows
1 jar of peanuts (I use "lightly salted")


Directions:
1. Combine marshmallows and peanut butter chips in a large mixing bowl. Melt in the microwave to a creamy and easily-stirrable consistency. (Keep an eye on it, too, because this could happen if you leave it in there too long...)


2. Pour in peanuts and mix together.
3. Spray a 9x13 pan and spread the mixture. It is thick and sticky, so I like to spray my hands too before patting it all out.
4. Let cool/harden. Cut into squares.

Variation:
Coat finished squares in Baker's dipping chocolate for homemade Baby Ruth!