Pages

Showing posts with label dessert. Show all posts

Friday, September 2, 2011

Homemade Funnel Cakes

These taste just like the delicious treats you'll find overpriced at the fair!

oil
3 eggs
1/4 C sugar
2 C whole milk
3 2/3 C all purpose flour
1/2 tsp salt
2 tsp baking powder
powdered sugar

On low heat, cook your oil.  It is best to start out with a lower temp oil (I set my burner between 4 and 6) and figure out how quickly you can work with your cakes.  The oil will continue to heat up no matter what temp you leave it on, you will have to gain speed as you go.

Beat your eggs and sugar, then slowly add milk.  Throw in your dry ingredients and mix thoroughly.  Unless you're fancy, use a gallon ziploc bag to squeeze out your batter.  Clip your corner fairly small and widen it as needed.  You want the batter to come out more slow than quick so you're able to get "streams" more thin than thick.  Make sense?  You'll learn as you go...

This is waaay too thick.  The hole in my bag corner was too big.


I think it is best to make smaller cakes, don't try to attempt the size you buy at the fair; otherwise, you'll end up splashing hot oil all over yourself and breaking your cakes!

When you see the toasty brown color creeping up the edges of your streams you can flip your cakes.  They cook quickly!


Once a light, toasty brown, set on some paper towels, add your favorite toppings and enjoy!


I found this original recipe on food.com, recipe number 8445.

Pecan Caramels

2 tsp. plus 1 C butter, divided
1 1/4 C sugar
1 1/4 C packed brown sugar
1 C dark corn syrup
2 C heavy whipping cream, divided
1 bag of chopped pecans
1 tsp. vanilla

Line a 9x13 in. pan with foil, grease foil with 2 tsp of butter and set aside.

In a large, heavy saucepan, combine sugars, corn syrup, 1 C cream and the remaining butter.

Cook and stir over medium heat until sugar is dissolved.  Bring to a boil.  Slowly stir in the remaining cream.  Cook without stirring until a candy thermometer reads 245.

It is best to have a thermometer that will hang off the side of your pan without touching the pan (you can adjust the depth of your thermometer as well).  

Remove from ehat and stir in pecans and vanilla.  Pour into your prepared pan and let stand until firm.  Lift the candy out with the foil then discard foil.  You can go ahead and cut it or, I found it easier to chill in the refrigerator then cut with a butcher's knife when the candy is harder.  You can then wrap with wax paper and either devour yourself or give away as a gift :)


Monday, August 29, 2011

Comatose Cookies and Cream Cupcakes


Ladies and gentlemen, the Comatose Cookies and Cream Cupcake. WARNING: May require insulin. Do not feed to young children after 8PM.

THE CUPCAKES (What You'll Need):
1 box of chocolate brownie mix
All additional ingredients required on brownie box
1 extra egg
15-20 oreos

1. Prepare mix according to instructions on box.
2. Spoon mixture into muffin cups.
3. Break oreos into halves (or smaller) and insert into the cups, covering with the mix to make a special surprise!


THE ICING (What You'll Need):
1 tub of Whipped Cream Cheese icing (or make your own from scratch)
1 row of oreos

1. Put oreos in a ziploc bag and crush them up. If you have a blender or food processor, use that. The finer the oreo mix, the better.
2. Mix crushed oreos and icing until smooth.

3. Cut a small corner off of a ziploc bag. Place the bag (corner cut down) inside a glass and spoon the icing mixture in. Twist the top of the bag so you can squeeze the icing out.


4. Squeeze a dollop of icing onto each cupcake.
5. Top with an oreo half or a mini oreo! (You can usually find a cup of the mini oreos by the checkout line at the grocery store for just $1.00!)


Enjoy!

Monday, June 20, 2011

Mamaw's Carrot Cake

Jim's Mamaw has the best carrot cake recipe. She makes it for Christmas each year. I wasn't sure I could make it as good as her...and I was right it isn't as good as hers....but it's pretty darn close :o)
****

Carrot Cake
1 1/2 c. Crisco Oil (she uses oil, so I use oil... I am not sure what it would be like with the solid crisco)
2 cups of sugar
4 eggs
2 c. all purpose flour
2 tsp. baking soda
2 tsp. baking powder
2 tsp. cinnamon
1/2 tsp. salt
3 cups grated carrots (I use the food processor for this. It makes the texture more fine, which is how I prefer it!)

Preheat oven to 350. Mix oil and sugar with hand mixer until blended. Add the eggs and mix some more. Sift dry ingredients together and add them to the oil/sugar/egg mixture. Fold in carrots. Grease pan, pour in batter and bake for 35-45 minutes.


Icing (also known as the best part!)
2 cups powdered sugar
8oz. cream cheese (softened)
1 stick of butter (softened)
1 tbsp. lemon juice (I leave this out because I usually don't have lemons laying around)
2 tsp. vanilla

Mix cream cheese and butter until creamy and combined. Add powered sugar in small batches until incorporated. Add the vanilla and lemon juice and whip until fluffy!

****


Mamaw bakes the cake in a 9x13, flips it out of the pan (think pineapple upside down cake) and then icings it. The few times I have made this, my cake always sticks in some places and my cake is no longer a perfect little rectangle. I am not sure what her trick is, since I grease my pan thoroughly...maybe you all will have better luck! (If you figure out a trick, please let me know!)

We had this for father's day, and it was a huge hit!


Monday, May 16, 2011

Strawberry Orange Trifle

I don't have a picture because I don't have one of those fancy trifle dishes (yet).  But it was very easy and yummy!

Ingredients:
4 (heaping) cups of sliced strawberries (I used sugar free frozen, pre-sliced)
1-2 cans (15 oz.) of mandarin oranges, drained
2 Tablespoons orange juice (or juice from the can of the oranges)
3 Tablespoons sugar
1 package of shortbread cookies, crushed (I used Keebler "Sandies")

1 1/2 cups whipping cream
1 (11 oz) jar lemon curd
OR
1 package cool whip
1 package lemon pudding prepared using package directions


1. Mix strawberries, oranges, OJ and sugar.  Let stand at room temp for 10 minutes.

2. If you use the cream and lemon curd, beat together at low speed with an electric mixer until blended. Gradually increase mixer speed, beating until medium peaks form.  If you use cool whip and pudding, prepare the pudding before you do anything else.  Then mix in mixer with cool whip til blended.

3.  Start layering ingredients.  Put 1/3 of fruit  on the bottom.  1/3 of creamy mixture next, and 1/2 of the crushed cookies.  Repeat.  Top layer will be creamy mixture.  If you want, garnish with strawberries on top. 

Notes: The amount of oranges depends on how many you want.  One can would be good, but use two if you want in orange in about every other bite.  You can also use fresh oranges, but canned mandarin are easier. 

Ok, let me tell you about this lemon curd.  It is so hard to find!!  And it was $3 for a small jar.  So if you are adventurous I would try the second option I listed and mix a container of cool whip with some milk and lemon pudding.  I think it would be the same consistency and taste, and cheaper.  I will try that next time. 

And I do plan on making this again, it was a light and delicious!  It does better for larger crowds (6-10+ people) where it is all eaten because the cookies get mushy if it is kept overnight.

Monday, May 9, 2011

Cookie Dough Cupcakes


Confused by your sweet tooth? Why settle for either cookie or cake when you can have both? Yes, I mean it... the Cookie Dough Cupcake. These are insanely easy, ladies, and insanely good.

Ingredients*:
1 Devil's Food cake mix (and all necessary accompanying ingredients)
1 package of break-and-bake chocolate chip cookie dough
*I am sure this would be really tasty with homemade cake and cookies, but this is the quick and easy way.


Directions:

1. Prepare cake mix and put in muffin cups. Bake for about nine minutes.
2. Remove cupcakes from oven. Break up cookie dough and roll each cookie into a ball. Drop one ball in each cupcake, pressing it down if it doesn't naturally sink.
3. Return cupcakes to oven and bake for the duration of the time required for the cupcakes.
4. Remove from heat, cool.
Icing is optional. Sometimes the cupcakes are pretty enough not to need it.

Enjoy!

Wednesday, May 4, 2011

Classic Apple Pie

I love making pies.  One of my favorite cookbooks is Farm Journal's Best-Ever Pies.  If there is ever a pie you need a recipe for and you've never heard of it before that person asked for it, you'll find it there. 

But now that you've googled it and found that you can only order used copies from Amazon and Barnes and Noble, understand that this recipe cannot be found there, only on this blog and whatever recipe book my highschool homec teacher had.  May dad asks for it every birthday!

Ingredients:
Pastry for two-crust pie (I don't venture to make my own, I buy Mrs. Smiths)
1/3 C sugar
1/4 C flour
1/2 tsp ground cinnamon
1/2 tsp ground nutmeg
dash of salt
8 C thinly sliced peeled tart apples (8 medium)
2 tbsp stick margarine

Heat oven to 425. Prepare your crusts or thaw according to package directions.

Mix your dry ingredients then add your apples and mix thoroughly. Pour apples into 1st crust.

Cover apples with dotted margarine then cover pie with 2nd crust.  Cut 4 slits in top crust and press edges together.  Cover edges with aluminum foil.

Bake pie for 40-50 minutes.  My oven usually does great for a full 40 minutes max.  If the crust starts browning too much before you've reached 40 minutes, place a sheet of foil over your pie until finished baking (nobody likes gooey bottom crust!)  Enjoy!

Friday, March 18, 2011

Really, Really Easy Pumpkin Muffins

This recipe is great for taking a snack to Sunday School, taking a dessert, or to just have for breakfast.  It is literally SO easy, a two year old could do it.  (with help with the oven, of course!)  Oh and it's a Weight Watchers recipe!!  If you make regular-sized muffins, they are 1 point each....so the minis are probably 1/3 point. haha But whose counting?

You will need:
One box of spice cake mix
One 15 oz. can of pumpkin (not pumpkin pie filling, just plain pumpkin)

THAT'S ALL!  No water, no eggs, no oil, no lard...

What you will need to do:

1.  Stir up the two ingredients.  It will look very dry at first but I promise, it will all get mixed in and be very moist.  So DON'T add water, ok?  It should look thick and "gloppy."


2.  Fill mini muffin tin 2/3 full, or a little more.  Or you can use a regular muffin tin (bake for 18-20 min instead).  They only rise a little bit...not as much as cupcakes or other muffins do.

3.  If you wish, you can add a few chopped pecans or walnuts and a sprinkle of brown sugar to the tops, just before you put them in the oven.  This probably knocks them out of Weight Watchers category though.  I added chopped pecans to half the batch.


4.  Bake at 350 for 12 minutes for minis.


5. Enjoy!  They can be served warm or room temp.  Not sure how they would be cold.  Picture shows one without pecans and one with pecans.


Recipe yields about 44 mini muffins or 12 regular muffins.

Easy, right? Yes.

Wednesday, March 16, 2011

The Peach Pioneer


So it's Spring Break, and being in the Floridian 80+ degrees, we developed a hankering for some peaches. Our friend Meagan, with whom we are staying in the Tampa Bay area, had a great recipe to try, and her husband fetched us some fresh peaches from the store. I was amazed that they had peaches already, but Meagan said these technically came from Chile. Either way, it was great to taste a real peach. We made this recipe for a breakfast dish and it went great with coffee. I think it would also be good to try using apples and some cinnamon.

What You'll Need:
Cake & Filling
2 cans crescent rolls
1 8-oz. package cream cheese
1/4 cup powdered sugar
1 egg yolk
1/2 teaspoon vanilla or almond extract
1 can (21 oz.) peach, cherry, or apple pie filling
Fresh peaches! (Or cherries, apples)
Nutmeg to taste

Glaze
1/2 cup powdered sugar
2-3 teaspoons milk

Directions:
1. Preheat oven to 350. Unroll crescent dough. Separate into 16 triangles, reserving 4 triangles for decoration. Arrange 12 triangles in a circle (on a round stone pan if you have one!) with wide ends toward the outside edge of baking stone and points toward the center (Points will not meet.) Lightly flour a rolling pin and roll dough into a 14-inc circle, pressing seams together to seal. There should be a 3-inch diameter opening in the center. Form a slightly raised rim along inner and outer edges of dough.
2. In a batter bowl, combine cream cheese, powdered sugar, egg yolk and vanilla (& nutmeg if you'd like!); whisk until smooth. Spread cream cheese mixture evenly over dough to within 1/2 in. of edge. Spoon pie filling evenly over cream cheese mixture. (We added fresh peaches with the pie filling. Good move.)

3. Using a pizza cutter, cut each remaining dough triangle lengthwise into three strips. Arrange dough strips evenly in spoke-like fashion over the filling. Press ends to seal at center and outer edges. Bake 25-30 minutes or until golden brown. Remove from oven; cool 15 minutes.

4. For glaze, combine powdered sugar and milk; mix until smooth. Drizzle evenly over cake. Cut into wedges. Serve warm.


Yield: 12 servings. (290 calories each)

(from Pampered Chef)

Friday, March 4, 2011

Homemade Carrot Cake with Cream Cheese Frosting

You will need:
2 1/4 cups flour
2 tsp baking soda
1 1/2 tsp cinnamon
1/2 tsp nutmeg
1/2 tsp salt
1 cup butter-flavored shortening (just pretend this isn't in there! :)
1 1/2 cups sugar
3 eggs, room temperature (important!)
3/4 cup buttermilk
2 cups shredded carrots
1 1/2 cups coconut (I thought this was a little much, so I used 1 cup)
3/4 cup chopped walnuts
1/2 cup raisins, optional (I did not use raisins)

For the frosting:
2 (8oz) packages of cream cheese
1/2 cup butter, softened (important!)
16 oz powdered sugar
2 tsp vanilla
1 tsp almond extract, optional (I didn't have this on hand, so I left it out)

What you need to do:
1. Preheat oven to 350.
2. Combine flour, baking soda, cinnamon, nutmeg, and salt in a bowl.
3. Beat shortening and sugar until fluffy.  Add room temperature eggs one at a time, beating after each addition (important!).


4. Shred 2 cups of carrots.

5. Alternately add the flour mixture and the buttermilk, starting and ending with flour.  Gently stir in carrots, coconut, walnuts, and raisins (if desired).


6. Pour batter into a 9x13 inch pan sprayed with cooking spray and bake for 55-60 minutes.  Cool and frost with cream cheese frosting.  Top with additional chopped walnuts, if desired.

7. For the frosting: Beat cream cheese and butter at medium speed with an electric mixer until creamy.
 8. Gradually add powdered sugar, beating until fluffy.  Stir in vanilla and almond extracts.  This makes A LOT of frosting, so you can keep it refrigerated and use it on other things like cookies or graham crackers.

 And enjoy!!

Wednesday, March 2, 2011

Homemade Payday


This is one of my favorite family recipes and I probably make it more than anything else I make. It's super easy, super tasty, and pretty inexpensive, so why not? No refrigeration necessary, so it's a great recipe for parties, Sunday School, or mailing to someone.

What you'll need:
1 package of Reese's Peanut Butter chips
1 package of mini marshmallows
1 jar of peanuts (I use "lightly salted")


Directions:
1. Combine marshmallows and peanut butter chips in a large mixing bowl. Melt in the microwave to a creamy and easily-stirrable consistency. (Keep an eye on it, too, because this could happen if you leave it in there too long...)


2. Pour in peanuts and mix together.
3. Spray a 9x13 pan and spread the mixture. It is thick and sticky, so I like to spray my hands too before patting it all out.
4. Let cool/harden. Cut into squares.

Variation:
Coat finished squares in Baker's dipping chocolate for homemade Baby Ruth!

Saturday, February 26, 2011

Red Velvet Waffles

Here is a recipe for Red Velvet Waffles with a Cream Cheese Frosting and Butter Pecan Syrup! I modified a recipe that I found online, and here was the result. It claims to make 4 servings, but mine went much farther than that. Store leftover mix in an airtight container in the fridge for breakfast the next day or two!

THE WAFFLES


What you'll need:
2 cups flour (I used Whole Wheat)
1 1/4 cups sugar
1/4 tsp. salt
1 tsp. baking soda
3 tbsp. unsweetened cocoa powder
1/8 cup butter, melted, cooled
1/8 cup vegetable oil
2 cups buttermilk
2 large eggs
1/2 tsp. cinnamon
1 tsp. vanilla
2 tablespoons red food coloring

Directions:
1. Separate eggs.
2. Beat egg whites until stiff.
3. Mix dry ingredients together then add wet.
4. Mix all ingredients together THEN fold in the egg whites.
5. Heat waffle iron and spray with non-stick cooking spray
6. Pour mix into waffle iron and cook until done!

THE FROSTING

What you'll need:
4 oz. cream cheese, softened
1 tbsp. sugar
Cool whip

Directions:
Mix it all together, soften in microwave if necessary. I layered small square waffles with the frosting and topped with Cool Whip.

THE SYRUP


What you'll need:
1 1/2 cups of maple syrup (I used a sugar-free, butter-flavored syrup with Splenda)
1/8 cup of butter (If you are not using butter-flavored syrup, do 1/4 cup)
1/2 cup of pecans

Directions:
1. Melt butter.
2. Add syrup and mix together.
3. Add pecans.

As I mentioned, my waffle iron is square shaped, so I layered 2 small waffles with frosting in the center, plopped a dollop of Cool Whip on top, then drizzled the butter pecan syrup. It was a fun change to the traditional waffle. Unfortunately, my Red Velvet Waffles have completely cleaned me out of red food coloring. Now I'm considering Blue Suede Pancakes?

Monday, February 21, 2011

The Best Blueberry Scones in the World!

I found this recipe here (source: Ben Millett) a few months ago while I was preparing to host my first extra fancy tea party (I love all things tea parties).  I've modified the instructions a little; feel free to use either mine or his.  They are simply divine.

Ingredients:

2 sticks of frozen, unsalted butter -you actually only use 10 tbsp
1 1/2 C fresh or frozen blueberries (or whichever fruit you prefer)
1/2 C whole milk
1/2 C sour cream
2 C unbleached all-purpose flour, plus additional for work surface
1/2 C sugar, plus 1 tbsp for sprinkling
2 tsp baking powder
1/4 tsp baking soda
1/2 tsp salt
1 tsp grated lemon zest (optional)

1.  Preheat your oven to 450 F
2.  Remove 1/2 the paper from your sticks of butter, grate the unwrapped ends (total of 8 tbsp) into a small bowl.  Freeze grated butter until ready to use.  Melt and set aside an additional 2 tbsp butter.
3.  Whisk together milk and sour cream in bowl, refrigerate until needed.
4.  Whisk flour, 1/2 C sugar, baking powder, baking soda, salt and lemon zest in large bowl.  Add frozen butter to flour mixture and toss by hand until butter is mixed well.

4.  Add milk mixture to flour mixture and fold with spatula until just combined.


5.  Liberally flour a work surface and knead your dough 6 to 8 times.  Add flour as needed to prevent sticking.  Roll dough into a 12 inch square.
6.  Sprinkle blueberries evenly over your dough and press them into the dough.  Loosen the dough from your work surface, you may have to use a metal spatula.

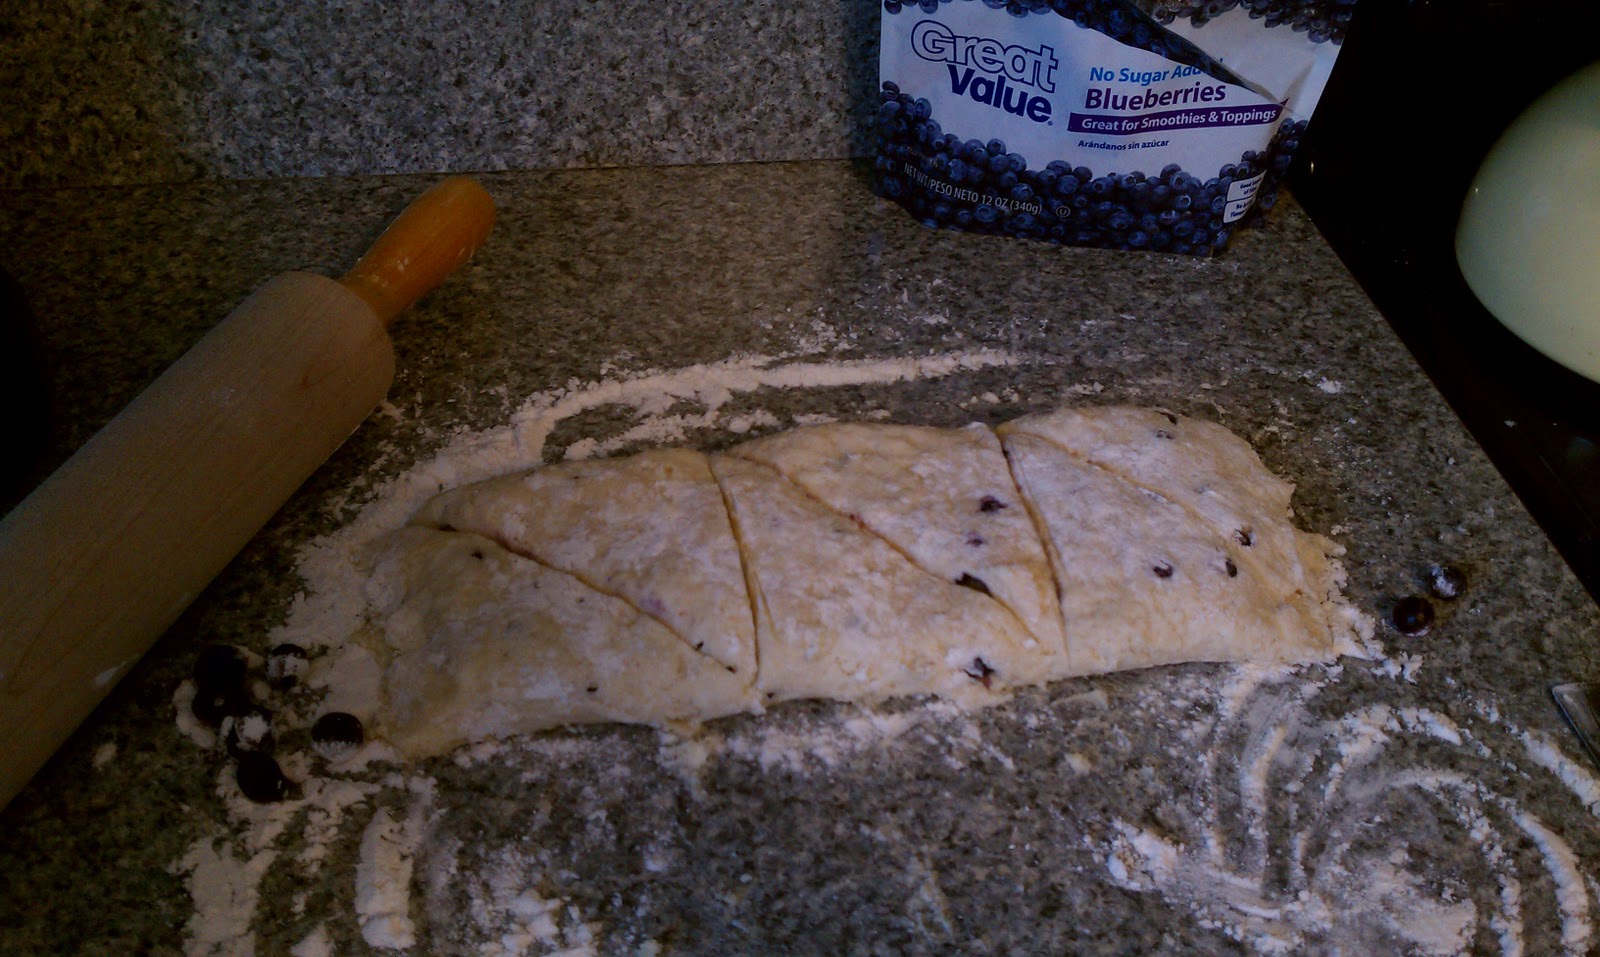
Roll your dough into a tight log then lay it seam-side down and press into a 12 by 4 inch rectangle.
Using a sharp knife, cut the rectangle crosswise into 4 equal rectangles, then cut each diagonally to form 2 triangles.
I actually went back and smushed it all together and followed my directions, made 8 instead of 6.

7.  Transfer to a parchment-lined baking sheet.  Brush tops with melted butter and sprinkle with remaining tablespoon of sugar.  Bake until tops and bottoms are golden brown, 18-25 minutes.

*Please don't judge that I used my countertop, I do not have a fancy work surface ;)  Also, please forgive that I only edited the last picture-too lazy and excited to finally post this!

*If you are making these ahead, you can freeze them.  Wrap them individually in aluminum foil and skip the butter/sugar sprinkle step and you should do this immediately before baking (freezing the scones with butter on top will make them gooey when they bake).  You can bake frozen scones on 375 F for 25-30 minutes.